3D to 2D – How to make better patterns faster using Peel3.CAD with ExactFlat
Pattern making tools and practices are evolving becoming faster, more accurate, scalable and flexible. One standout innovation is the 3D Scan-to-Pattern workflow, which replaces traditional fabric draping over physical prototypes. Instead, physical parts are captured using Peel 3D scanner, and the resulting digital models are converted into precise 2D patterns. When implemented correctly, this workflow offers significant advantages in speed, accuracy and repeatability. In the following overview, we will break down the process step by step, with a focus on key time saving practices. Thanks to modern tools like the Peel 3D scanner from Creaform and ExactFlat software, this process is now more accessible, precise, and efficient than ever before. Here's how this powerful workflow unfolds.

Step 1: Capturing Physical Objects with Peel 3D
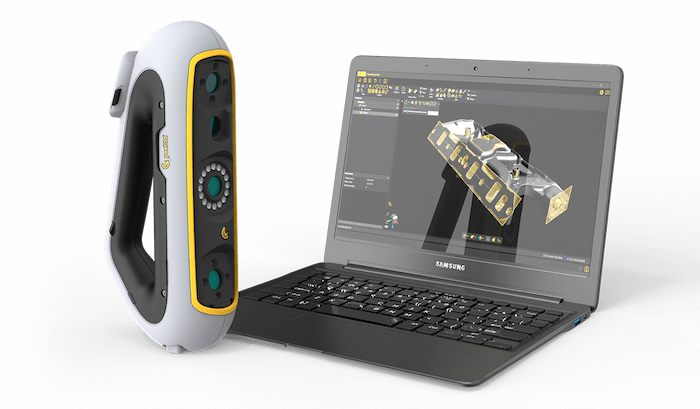
The process begins with the Peel 3D scanner, a portable and user-friendly device designed to capture high-resolution 3D data from real-world objects. Whether scanning a car seat, a mannequin, or a custom furniture component, Peel 3D makes it easy to digitize complex surfaces with speed and precision. Compared to traditional measurement methods, Peel 3D offers a faster, more accurate and more scalable solution, ideal for modern pattern-making workflows.
Key features:
- Plug-and-play setup with USB connection
- Ergonomic, easy-to-use design for comfortable handling
- Superior performance on black, shiny, or textured surfaces
- Reliable scanning in low-light environments
- High accuracy (up to 0.05 mm)
- Texture and color acquisition
- Real-time feedback during scanning
Once the scan is complete, the data is exported as a mesh file (typically in STL or OBJ format), ready for digital processing in the next step of the workflow.
Step 2: Cleaning and Preparing the Mesh
Before moving to pattern flattening, the scanned mesh must be cleaned and optimized to accurately reflect the geometry of the intended pattern pieces.
The mesh preparation process typically involves the following actions:
- Remove unwanted geometry such as background elements not part of the final design
- Fill holes and gaps to create a complete, watertight mesh
- Smooth surfaces to reduce noise while preserving key details
- Sharpen and straighten edges for cleaner, more defined contours
- Cut and segment the mesh into individual pattern pieces based on the intended design
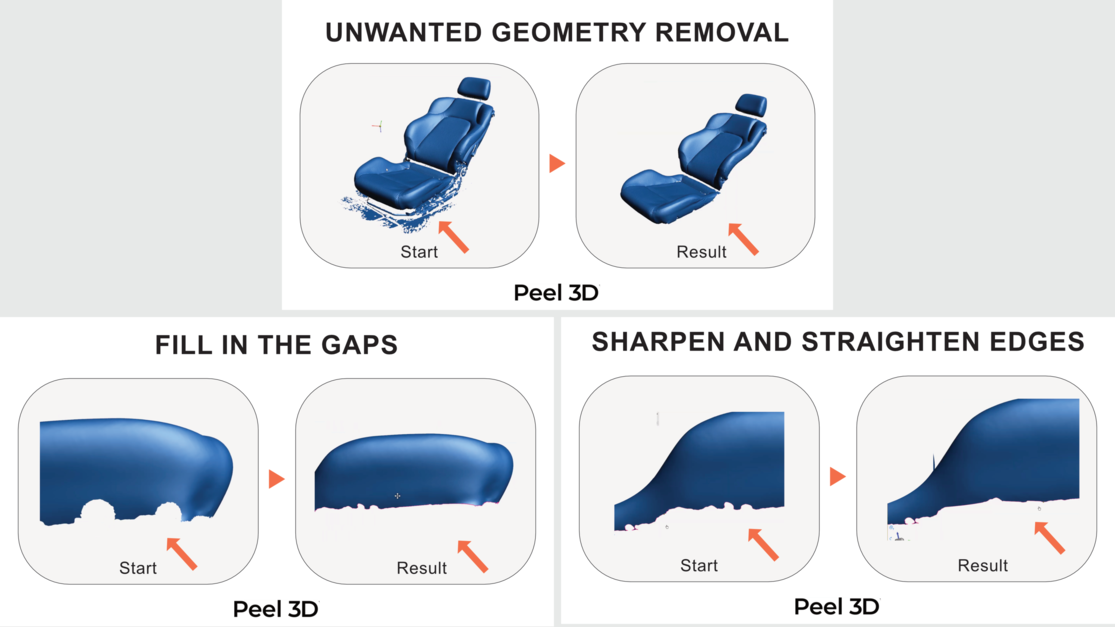
Peel.CAD, the software behind the Peel 3D scanner, offers intuitive mesh editing tools that ensure scanned models are clean and ready for pattern development. According to ExactFlat´s CEO, Eaton Donald, after testing several devices, Peel3.CAD offers the most efficient solution for preparing scan data for 3D-to-2D conversion and adding pattern features. In comparison, similar tasks using other tools could take up to ten times longer.
Step 3: Importing into ExactFlat
With the mesh cleaned and prepared, it’s time to bring it into ExactFlat, a specialized CAD plugin (typically for Rhino or SolidWorks) designed to convert 3D surfaces into accurate 2D patterns.
ExactFlat Capabilities
- Automatic mesh flattening for both simple and complex surfaces, while maintaining edge associations for faster pattern development.
- Material behavior simulation, including stretch, shrink, and strain analysis
- Automated Seam and notch creation to streamline production
- Grainlines and markings tools for precise layout and alignment
- DXF and PDF export options compatible with CNC cutting systems
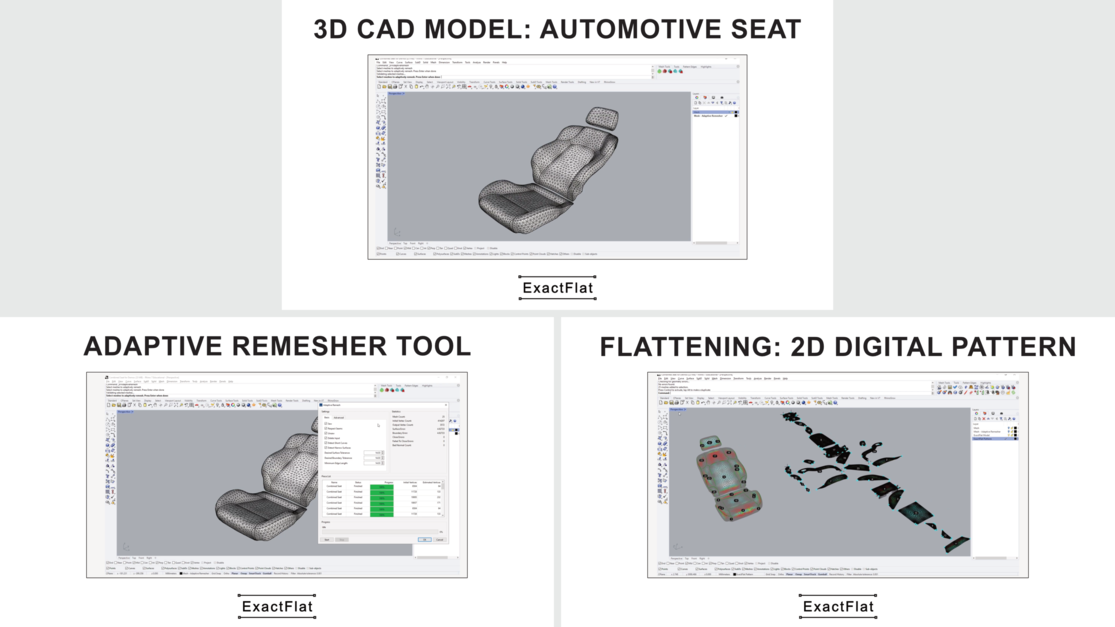
ExactFlat analyzes the imported 3D geometry and applies advanced algorithms to generate accurate 2D representations, accounting for material properties and desired fabric tension.
Step 4: Refining and Exporting the 2D Patterns
Once the 3D mesh has been flattened into 2D patterns, the final step is to refine and prepare them for production.
This includes:
- Adding seam allowances, notches and alignment marks
- Labeling pattern pieces for easy identification
- Applying grainlines and orientation guides for accurate layout
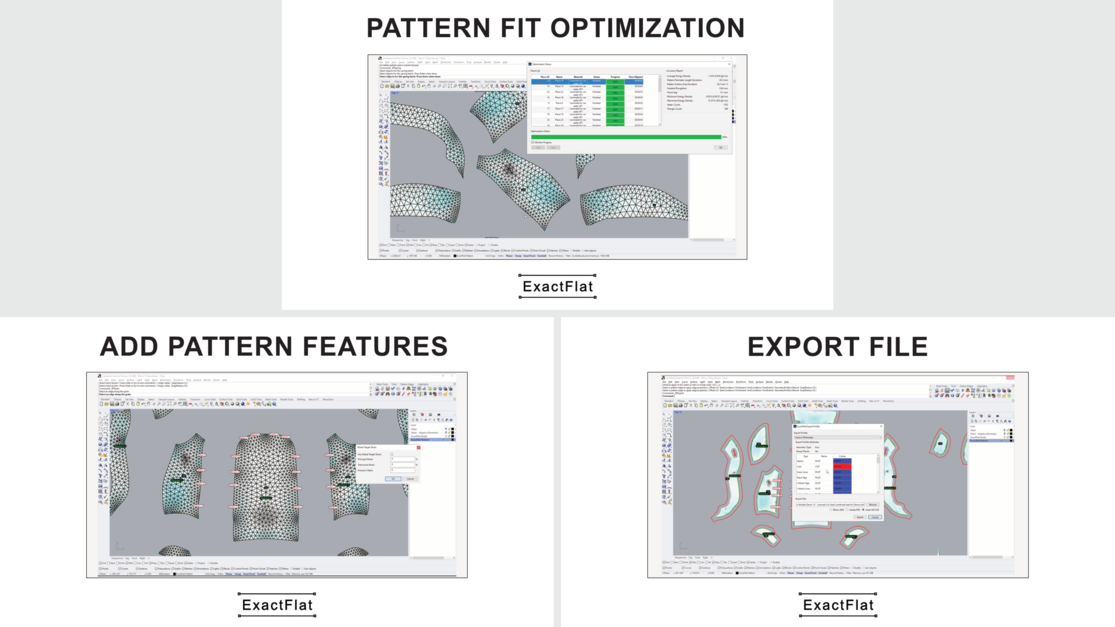
The completed patterns can then be exported in standard formats (DXF, PDF, or CAD formats) for cutting, printing, or digital fabrication.
Cross-Industry Applications
This workflow is indispensable for high volume, precision-driven industries, including:
- Automotive: seats, trim, flooring (car mats), and headliners
- Marine & Aerospace: interior components and fittings
- Motorcycle: parts and seats
- Furniture & Soft Goods: custom upholstery and design
- HVAC Systems: insulation and duct covers
- Wearables & Fashion: prototyping and fit testing
- Footwear: design and pattern development
- Inflatables: complex shape patterning
- Carbon Fiber: surface capture for composites
By bridging the gap between physical and digital, Peel 3D and ExactFlat enable designers and manufacturers to accelerate workflows, minimize material waste, and enhance product fit and finish.
This solution provides a streamlined, accurate, and cost-effective solution for converting real-world objects into production-ready 2D patterns. Whether you're a designer, engineer, or artisan, this workflow unlocks new possibilities for creativity and precision.
If you want to learn more about the 3D scans to 2D patterns workflow, you can watch the recording of the Webinar: 3D to 2D - How to make better patterns faster using Peel.CAD with ExactFlat
Wonder how Peel 3D can transform your work, solve problems, and save you time?
Contact our Peel 3D experts